How to Generate Multilingual Video Ads with ComfyUI, Wan 2.2, and Sarvam AI
Turn a single English brand prompt into a 30-second vertical video ad in six Indian languages. This tutorial wires ComfyUI, Wan 2.2 video diffusion, and Sarvam AI's Indic LLM and TTS into one reproducible pipeline.
Running a video ad campaign across India means shipping the same creative in six or more languages. Studios solve this by shooting once and dubbing later — the visuals stay constant, only the voiceover changes. This tutorial reproduces that exact workflow with open-source video diffusion and a single API for Indic language generation.
By the end of this guide you'll have a command-line tool that takes one English brand prompt and produces six 30-second vertical MP4s — one each in Bengali, Odia, Telugu, Tamil, Hindi, and Marathi - sharing identical visuals but with native voiceovers in each language.
What you'll build
A reproducible ComfyUI workflow plus a TypeScript SDK that:
- Uses Sarvam-M to draft a 30-second ad script from your brand prompt.
- Generates six 5-second clips with Wan 2.2 (480×832) and stitches them into a vertical 30-second video.
- Translates the script via Sarvam's translate endpoint and produces native TTS for each language.
- Muxes audio and video and writes one MP4 per language to disk.
The hardware we used
We ran the entire pipeline on a single Podstack ComfyUI template with the following configuration:
- GPU: 1× NVIDIA L40S, 48 GB VRAM
- vCPU: 110
- RAM: 241 GB
- Persistent storage: 100 GB NFS volume mounted at /data (used for model weights and custom nodes - see Step 0)
- Software image: ComfyUI 0.20.1 on PyTorch 2.6 / CUDA 12.4 (Conda env
comfyui)
End-to-end runtime for six languages from a cold prompt: 22 minutes. That includes Sarvam script generation, six Wan 2.2 video passes (the latents are reused, only the voiceover changes per language), translation, six TTS calls, and the final mux.
Cost: Podstack vs the hyperscalers
Podstack bills per minute at ₹2.96/min for this configuration. The 22-minute run cost us ₹65.12 (~$0.78 USD) - one chai's worth of compute for a six-language ad batch.
Here's how that lines up against on-demand pricing on the hyperscalers for comparable hardware (single L40S with enough CPU/RAM to handle the video stitching, list price, US regions, mid-2026):
- Podstack (110 vCPU / 241 GB / 1× L40S): ₹2.96/min → ₹65 for 22 min
- AWS g6e.12xlarge (48 vCPU / 384 GB / 1× L40S): ~₹14.5/min → ~₹320 for 22 min (≈5× Podstack)
- Azure NVads L40S v5 (single-GPU SKU, 36 vCPU / 220 GB): ~₹11/min → ~₹245 for 22 min (≈3.8× Podstack)
- GCP g2-standard-96 (L4, not L40S — closest CPU/RAM match): ~₹9/min, but L4 ≠ L40S so you'd run longer and lose VRAM headroom
Hyperscaler numbers are list/on-demand prices and don't include egress, persistent disk, NAT, or India-region surcharges — all of which push real-world bills 20–40 % higher. Podstack's INR-denominated billing also avoids FX markup on your card statement.
The qualitative gap is bigger than the raw multiplier: the hyperscalers will happily charge you for the whole hour you spent waiting for the spot quota, the IAM role, and the VPC peering. Podstack's template is one click and bills the 22 minutes you actually used.
Prerequisites
Before you start, make sure you have:
- A Podstack account with billing enabled (you'll deploy the ComfyUI template in Step 0).
- A Sarvam AI API key. Sign up at sarvam.ai and copy the key from the dashboard.
- Node.js 20+ and pnpm on your local machine.
- Optional: a
kubectlconfig if you prefer shell-over-kube to the web terminal.
Step 0 - Launch a ComfyUI pod on Podstack
From the Podstack console, choose Deploy → Templates → ComfyUI. Pick the L40S 48 GB flavour. Then - and this is the part most first-time users miss - attach a persistent volume and mount it at /data.
The /data mount is not optional. The ComfyUI image's entrypoint symlinks /data/custom_nodes → /opt/ComfyUI/custom_nodes and /data/models/<subdir>/* → /opt/ComfyUI/models/<subdir>/ on every container start. Without /data mounted, your custom nodes and the 14 GB of Wan 2.2 weights are wiped on every pod restart, and you burn 20 minutes re-downloading them each time.
Suggested volume size: 100 GB - enough for Wan 2.2 + VAE + CLIP + future model swaps. Smaller volumes will fill up the first time you try a second model.
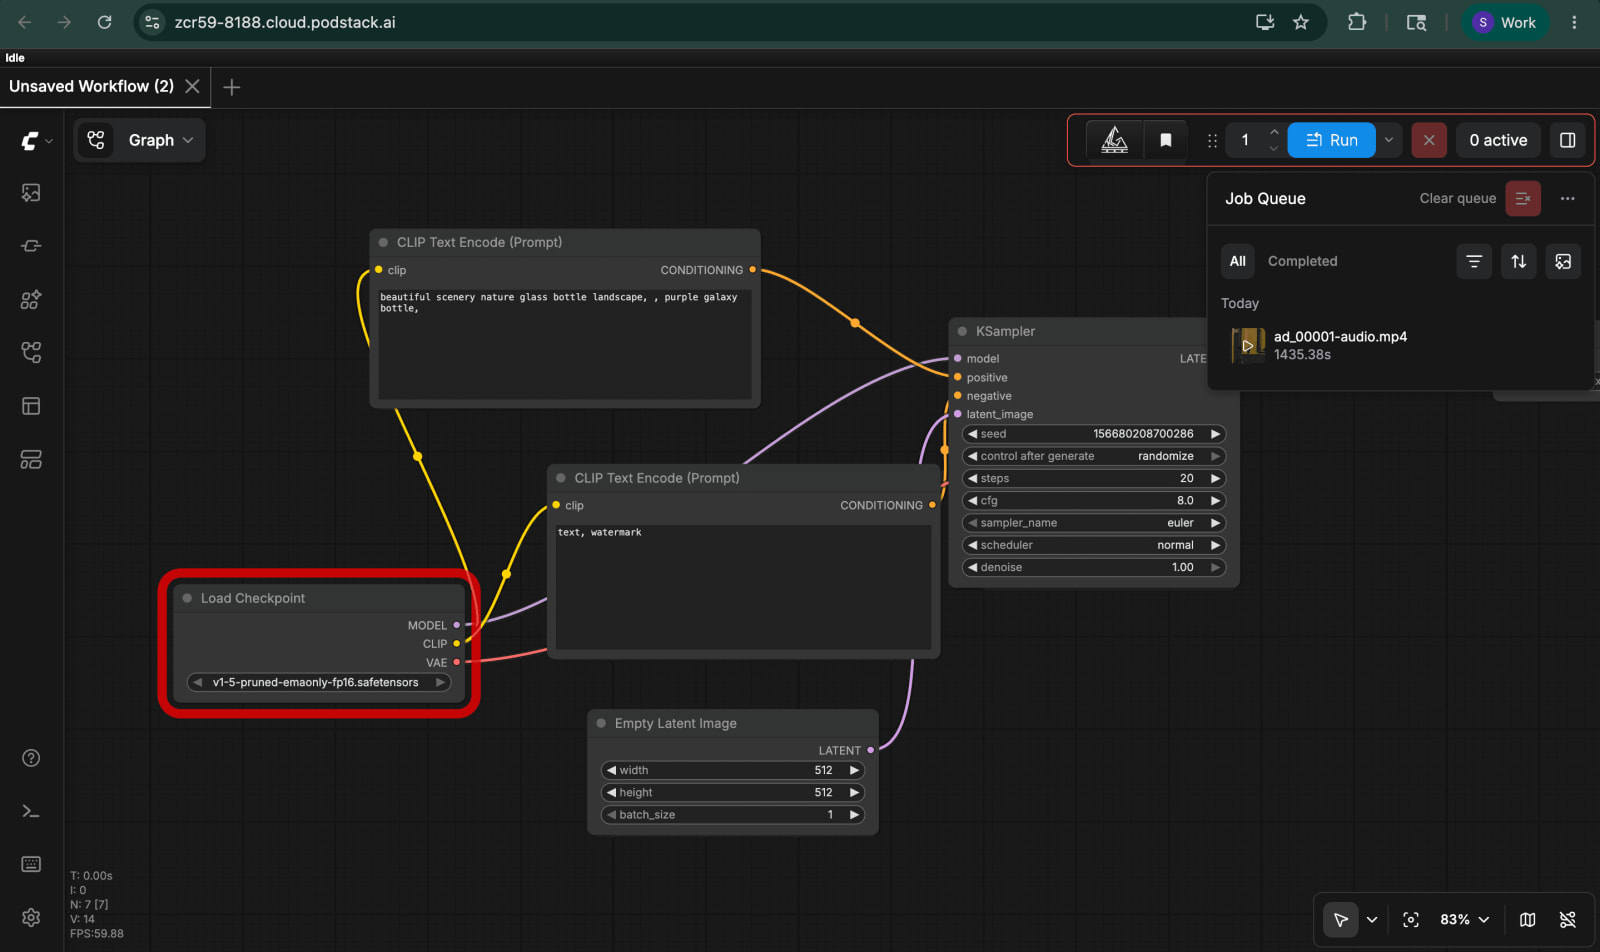
Click Deploy. The pod is reachable in ~60 seconds. Note the assigned URL (e.g. https://zcr59-8188.cloud.podstack.ai) - that's both the ComfyUI UI and the SDK target.
Step 1 - Install the custom nodes on the pod
Open the Podstack web terminal (or kubectl exec) and clone the project under /opt/multilingual-ad. The install script downloads the Wan 2.2 fp8 UNet checkpoints, the matching VAE, the CLIP vision encoder, and pip-installs three custom Sarvam nodes (SarvamScriptNode, SarvamTranslateNode, SarvamTTSNode) into the ComfyUI conda environment.
export SARVAM_API_KEY="sk_..."
bash /opt/multilingual-ad/scripts/install_on_instance.sh
The script writes the key to /data/env.sh (mode 0600) so the entrypoint sources it on every restart — meaning your Sarvam key survives pod restarts the same way your models do. It takes about 20 minutes - most of that is the ~14 GB Wan 2.2 weights download landing on /data.
Once it finishes, restart ComfyUI. There's no supervisorctl in the default image; killing python main.py is enough to trigger a clean pod restart and re-symlink the new custom nodes from /data.
Step 2 - Build the workflow graph once
Open the ComfyUI UI at your pod URL and build the graph from scratch - or import the starter graph from workflows/multilingual_ad.json. The shape is:
SarvamScriptNode → (script text) → six parallel KSampler branches (one per 5-second clip) → VAE Decode → Image Batch Concatenate → VHS_VideoCombine. In parallel, SarvamTranslateNode → SarvamTTSNode feeds the audio input of VHS_VideoCombine.
Export the finished graph as API JSON (Save (API Format)) and commit it to workflows/multilingual_ad.json. Then map the input node IDs in sdk/src/nodes.json so the SDK knows which nodes to overwrite per run.
Step 3 - Run the SDK from your laptop
The SDK targets the ComfyUI HTTP API. It queues the workflow six times: the first run captures the generated English script and the latent seeds; the remaining five reuse them, swapping only the language code passed to SarvamTranslateNode and SarvamTTSNode. This is what guarantees identical visuals across languages.
cd sdk
cp ../.env.example ../.env
echo "SARVAM_API_KEY=sk_..." >> ../.env
pnpm install
pnpm run ad --prompt "Premium chai brand, cozy monsoon vibe"
Outputs land in sdk/outputs/<lang>/ad_<lang>-IN_<seed>.mp4 - six files, all sharing the same seed and prompt, differing only in the voiceover track. End-to-end wall-clock on the spec above: ~22 minutes.
Step 4 - Iterate on prompts and languages
Restrict the run to a subset of languages while you iterate on visual quality, then expand once you're happy:
pnpm run ad --prompt "..." --langs bn,hi
pnpm run ad --prompt "..." --seed 7
A fixed seed pins the entire batch to the same visual roll, which is the common case for ad QA - you want every reviewer looking at the same shot.
Gotchas worth knowing
Sarvam-M is a reasoning model. Its raw completions include a <think> preamble before the final answer. The SarvamScriptNode strips it before downstream nodes see the text - if you wire Sarvam-M into your own graph, do the same or your script will leak chain-of-thought into the voiceover.
Wan 2.2 ships as separate high-noise and low-noise UNets. Use the fp8 variants - they fit in 48 GB with room for the VAE, while the bf16 variants do not.
VHS_VideoCombine silently produces a silent MP4 if the audio input isn't wired. If your output has no voiceover, re-check that connection before anything else.
If you forgot the /data mount in Step 0 and the install script appeared to succeed, you'll find out the hard way on the first pod restart when MISSING: SarvamScriptNode shows up in the verify script. Re-deploy the pod with the volume attached — there is no in-place rescue.
Conclusion
You now have a one-command pipeline that turns a brand prompt into a campaign-ready set of localized video ads, running on an Indian-billed L40S for under a dollar per batch. The interesting part isn't that any one model is doing magic - it's that the production pattern (generate visuals once, swap only the voiceover) maps cleanly onto a ComfyUI graph, a small SDK on top of it, and a pod template that bills per minute instead of per hour.
Next steps: extend the language list (Sarvam covers 11 Indic languages), swap Wan 2.2 for a higher-resolution model when your VRAM budget allows, or wire the SDK into a queue so a marketing team can self-serve through a form. The graph stays the same; only the inputs change.
Watch the output
Here's one of the actual MP4s the pipeline produced - the Hindi voiceover variant from a "Premium chai brand, cozy monsoon vibe" prompt. Visuals are identical across the other five languages; only the audio track changes.
▶ Play sample-output-hindi.mp4 · (1.3 MB, hosted on the Podstack-ai/example repo)
Try it yourself
Spin up the same ComfyUI template we used at podstack.ai - new accounts get a joining bonus that covers more than enough credits to run this six-language pipeline end-to-end and have room left over to experiment.
All the code in this post - the install script, the custom Sarvam nodes, the workflow JSON, and the TypeScript SDK - is open source at github.com/Podstack-ai/example. Clone it, point it at your pod, and you should have your first multilingual ad batch in under 30 minutes.

Saurav Kumar · Founder
Saurav leads Podstack's vision and strategy, driving the company's mission to make GPU cloud infrastructure accessible to every ML team. With deep experience in cloud computing, infrastructure engineering, and business operations, he oversees product direction, partnerships, and company growth. His passion for democratising AI compute powers Podstack's commitment to delivering high-performance GPU resources at competitive pricing.
Related posts

How To Blur Faces in Videos Using a Jupyter Notebook on Podstack
Anonymise faces in 550 videos with MTCNN and OpenCV on a Podstack GPU pod. This Jupyter notebook tutorial streams WebVid-10M, detects every face, applies Gaussian blur, and zips the output — 171,480 faces processed in ~92 minutes.

How To Fine-Tune an LLM with Unsloth Studio on Podstack
Learn how to fine-tune a large language model using Unsloth Studio on Podstack. This step-by-step tutorial covers deploying a one-click GPU pod, configuring a QLoRA run on TinyLlama, monitoring training, and exporting your fine-tuned model — no Python scripts required.

Is AI Infrastructure the New EV - Already Obsolete?
AI hardware generations turn over every 18 months. But the real risk isn't that the chips stop working - it's that the economics shift underneath you before your depreciation schedule catches up.